
Engineering Portfolio
VEHICLE DESIGN CHALLENGE
Introduction To Design Course
One of the staple classes that all Mechanical Engineers at Oregon State University take is ME 382, which is an introduction to design course. The class is structured around an end of term competition resembling that of American Ninja Warrior. Every term the competition changes, however, for example, one term students were tasked with designing neutrally buoyant blimps capable of picking up balloons, another term students were tasked with designing amphibious vehicles capable of transporting rice across an obstacle course. In the term I took ME 382 we were tasked with designing a robot capable of completing an obstacle course consisting of the obstacles listed below:
Stability Test: A narrow channel consisting of various sized PVC pipes.
Balance Beam: 30° incline followed by narrow platform and 30° decline ramp.
Tunnel: 1.5m plastic corrugated pipe.
See-Saw: 2m long see-saw resulting in 30° incline and decline.
Jump: 15° incline to 0.5m gap.
Drop: 1m free-fall drop.
Funky Bar: 1.5m 3/8'' Steel bar located 0.35m above the ramp.
Warped Wall: Scaled down version of American Ninja Warrior warped wall.
The competition also had a series of design parameters set forth by the professor which acted as design constraints for all teams, these include:
Volumetric Parameters (30cm x 30cm x 30cm)
The device must be remote controlled.
Must be powered by rechargeable batteries.
The total cost of the bot can not exceed $200.
Concept Generation
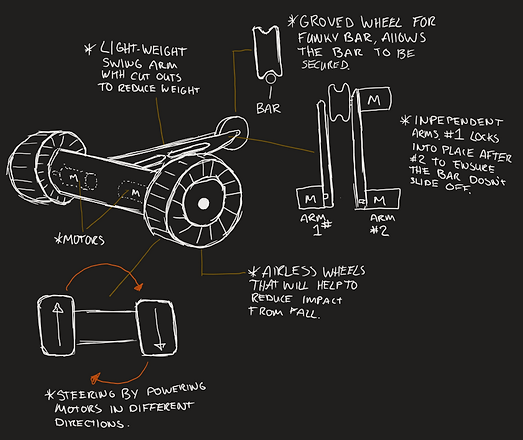
At the beginning of the term, our team sat down and discussed what we wanted our bot to look like before going into concept generation. Most teams went with 4 wheeled bots and Ackerman steering however we didn't want to be like the rest. For this reason, we decided we would build a two-wheeled bot that steers using a differential drive system. Below is one of my first concept drawings of a potential bot design.
Design Review 1
The first design review of the course required each student to manufacture their own prototype that answered a specific question about their bot design. I wanted to test how we could manufacture our cylindrical housing. I decided I would construct the housing out of wood and a plastic bottle.

Final Design Considerations
As a team, we decided that a bot somewhere along the lines of my concept drawing is what we would manufacture. Although with the help of the team's prototype designs we learned that there would need to be some major design changes to reduce the complexity of the manufacturing process. The most important was changing the cylindrical central housing to a square one. Allowing us to easily secure and mount our various components. Below you can see the final design of our bot.

FEATURE HIGHLIGHTS
Linear Actuation:
Our team was able to achieve the required extension through the use of our rack and pinion system. The rack was secured to the internal aluminum rod which was guided and secured by an external aluminum sheath. A micro servo was then secured to the end allowing the bot to traverse the "Funky Bar" once attached.


Kickstand System:
In order to traverse the "Funky Bar", we needed to rotate our bot approximately 90°. To achieve this we used a servo to drive the kickstand.


Roll Over Prevention:
To ensure that our bot wouldn't flip completely over when attempting to attach to the "Funky Bar" we designed a rollover prevention system consisting of two prongs that would make contact with the ground ensuring the bot comes to rest when the tail segment is approximately perpendicular to the ground. This action can be seen in the images above.

Airless Tire System:
In order to survive the 1m drop during the competition, we wanted our bot to be able to disperse the energy upon impact. We were able to achieve this through two means, the first being our airless tires. Originally we planned on 3D printing our tires in a flexible resin, however due to some constraints of the competition we had to 3D print our tires out of PLA. The second system in place to help disperse impact energy was our rollover prevention system, allowing the energy to be translated directly into the two largest machined parts on our bot.

Manufacturing Process:
Our team decided we would manufacture most all of our components out of aluminum with the exception of the acrylic sheets and 3D printed wheels. This would help to ensure our bot had the durability required to survive the competition, it also challenged our team's manufacturing capabilities thus further developing them.


Final Competition
This team was hands down my favorite group of individuals I have worked with on a group project during my time at the University. Everyone contributed evenly and was always more than happy to hear out ideas and changes. At the competition out bot ran into some technical difficulties and we were unable to complete the full obstacle course. Regardless, the process of designing and building a bot from the ground up taught us some valuables lessons that will no doubt be beneficial to us in our future endeavors as engineers.
.jpeg)
Contributions:
Concept generation of bot designs.
CAD modeling of system components.
Manufacturing of aluminum and acrylic components.
Assembly of bot resulting in a fully functioning system.